 First off, the inspiration for this upgrade is in large part due to the fantastic post that Mike525 made on “Upgrading the W205 Burmester Audio” WordPress article. The upgrade was conducted on a 2015 C400 W205 with the Burmester Audio package. My initial experience was like many, I expect, in that the sound of the system sounded good at the showroom and after a couple of months my opinion changed as follows:
- Sound reproduction in both the high and low end was not accurate. I am not an expert, but my personal comparison using a set of good headphones against the Burmester convinced me that sound quality was lacking.
- At med-high volume sound distortion was evident and noticeable rattle was coming from the rear passenger door speakers
Thus began the plan to upgrade my Burmester sound system. In my search for upgrades, I quickly identified that was very little in the way of information about the W205 Burmester system. The two sources that I found available are:
Mike’s article appealed to me and addressed the sound quality issues that I had and with that I went on a search for a stereo installation expert which led me to Nick of “The Car Audio Shop”, in Austin, TX. After speaking with Nick the following was decided.
- The build used in the “Upgrading the W205 Burmester Audio” would be the basis of the upgrade.
- Use of an additional set of Focal K2 Power 100KRS speakers in the rear passenger area.
- Use a stealth subwoofer enclosure in the trunk on the driver’s side to preserve as much trunk space as possible and to not interfere with folding rear seats.
Build Out
Items List for the Upgrade
Match 82 PP DSP – Digital Sound Processor/Amplifier, 8 configurable channels x 55 Watts / 110 Watts- Helix V EIGHT DSP – Digital Sound Processor/Amplifier, 8 configurable channels x 75 Watts / 120 Watts
- JL Audio FiX™ 82 – Removes factory sound processing for aftermarket speakers and amps
- CT Sounds 8 inch Subwoofer – 800W RMS
- CT Sounds AT-900.1d – 1 Ohm @ 12.8v, 500w rms l 1000w max
- 2x Focal K2 Power 100KRS – two 4″ woofers, 2 tweeters, 2 external crossovers, and 2 woofer grilles
Power Wiring of the Components
Below are pictures of the quality of the wiring showing 8AWG and using black(+) and red(-) leads to the CT AMP from the fuse box. The leads were post wrapped for extra safety.
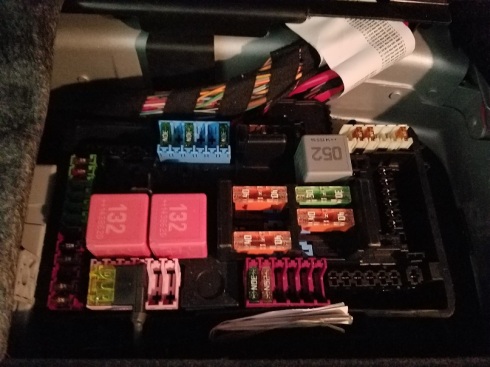
Below is a picture of the wiring into the Mercedes fuse box, note the black fuse connector on the bottom
Below is a picture of the Mercedes stock amp and the addition of the Focal Crossovers
Below, picture of the CT Sounds amp located in the cargo well in the trunk
Below is a picture of the cargo enclosure with the cargo grate placed back in it’s original location
Speaker Wiring
Additional wires were run for each of the Focal KRS 100 Tweeters. This is to allow for tuning of a true 3 way configuration of high, mid and bass with the Match. Below are several pictures of the door Molex connectors through which the wires were run.
Picture of the Molex form the rear
Picture above of the disconnected door Molex, the additional wire was run through the available wiring hole on the upper R
Focal 4” Speakers Installation
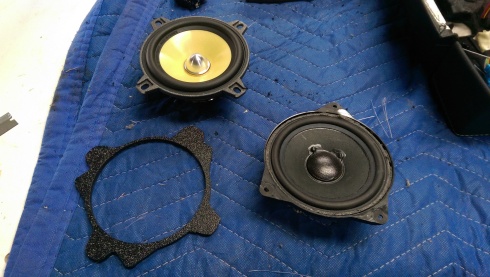
The picture below shows the Focal KRS 100 4″ mid-range speaker (top), custom mounting bracket (lower L) and the stock speaker (lower R).
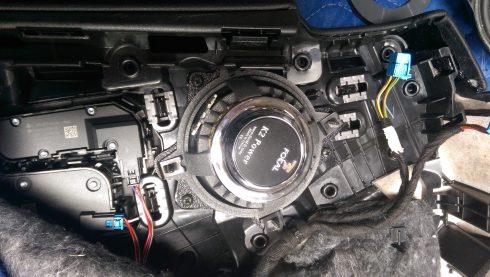
The picture above shows the final mounting of the Focal 4” in the door enclosure
Focal Tweeter Installation
Replacement of the stock tweeters was straight forward. The stock mounting enclosures were used and
Subwoofer Enclosure
As mentioned in the introduction the goal was to was to minimize the trunk space loss or usage with the sub. With this in mind, there was only one real option which was to build an enclosure on the drivers side which:
- Does not interfere with the rear seats folding down for increased trunk space
- The space used on the right side takes up only a small amount of usable space, but provides a suitable area for the speaker and enclosure.
- Use of the cargo area below the trunk remains usable and accessible without modify the stock cargo cover.
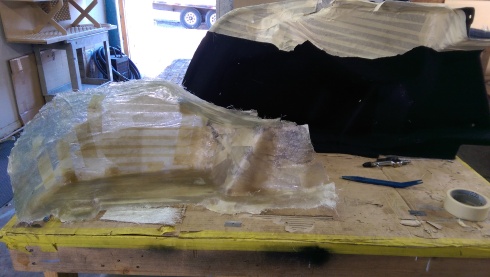
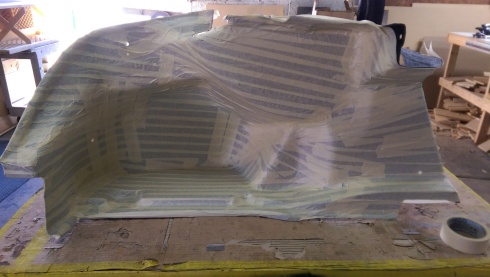
Below, the driver’s side trunk area was first formed out to hold the CT Sounds 8” subwoofer.
Below, after several layers of fiberglass resin the box was formed.
Below, the mounting bracket to hold the subwoofer was built into the enclosure.
Below, formation of screen around the enclosure.
Below, the enclosure after several layers of resin.
Below, Side view of the enclosure.
Below, finished look of the sub enclosure
Below, finished closeup of the subwoofer
Subwoofer Power control
The CT Sounds AT-900 has a power/volume control that was mounted inside the center armrest console (below). The location is ideal as it is not visible when the armrest is closed and does not interfere with the console interior. Volume control of the subwoofer is toggled on and off from pushing the dial in.
6.5-6.75 Footwell speakers
Modifying the stock Burmester “bass” speakers that are located in the driver and passenger foot-well’s was not done, however I have included a picture of their location below. I am considering replacing these as well at a later time as needed (and if my wallet recovers)…
Match PP 82DSP and replacement with Helix V EIGHT DSP
The installation of the Match PP 82DSP failed. Two different units were used and in both instances the unit was unable to power up. Helix (AudioTec Fisher) technical support (which was excellent) was used in both cases. In my opinion the problem was that the modified harness used for the connection to the DSP was the cause with the unit being very sensitive in some manner . The solution to our problem was to upgrade the unit to the V EIGHT DSP which has the same features but more power.
Sound configuration using Configuration
Configuration of the sound was done using the Audiotec DSP tool. This is a Microsoft Windows only application. A mini usb cable is used to connect the Helix V EIGHT DSP to your laptop to utilize the tool. I recommend purchasing a 10ft cable to enable you to sit in the driver seat and tune the sound from your driving location. With the PC-Tool you are able to control the sound level, filter, crossover and equalization and timing of EACH speaker, AMAZING. I recommend locating the ATF_Sound_Tuning_Magazine-DSP guides (4 of them) that cover how to use the tool to tailor the sound to your liking.


